Bulk Email Sender Free Download
Bulk Email Sender is very user friendly so you
won’t need any special training. You will understand it yourself only when you open
software and check it out yourself.
There are mainly five modules of this software:
1) SMTP Setting,
2) Message Setting,
3) Import Excel,
4) View Saved Message,
5) Send Bulk Email.
SMTP Setting :- You will need to set your Name, Email, Password, Reply To, Host and
Port number.
- Email and Password will be used for authorization. Host would be any valid smtp like smtp.gmail.com if you are using Gmail. And Port number is 587 for Gmail.
- And after updating it, wait for authentication, you will get pop up message for your confirmation.
Now, let’s understand about how to set SMTP :
- SMTP means Simple Mail Transfer Protocol. If you want to send Email then you need any protocol by which you can send Email.
- Hosting Provider companies, Google, Yahoo, MSN etc. provide SMTP. For Example, If you want to use Gmail’s SMTP then you will need to set your Gmail Email and Password. Then you need host which includes mail server smtp url. For Gmail, use host as “smtp.gmail.com”, Similar for yahoo its smtp.yahoo.com and it may differ from Email provider to provider. Next part is port, For Gmail, its 587. After that, you need to check EnableSSL based on your service provider. For Gmail, check it.
- Now, Just click on Update button. It will show you message updated data and It will tell you to wait till the time It verifies your Email and Password.
- After successful message, It’s done. You can send email to anyone now.
- If you have host any website then ask them for SMTP. And set it.
- If you have any doubt then you can Email me and I will guide you for it.
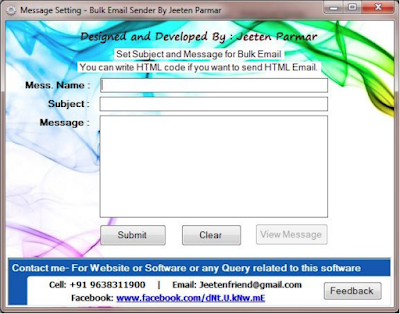
Message Setting :- Set any subject and message and specially unique Message Name
which you want to include in bulk Email. You can also view your typed message before
updating it.
- Message Name will allow you to set number of messages you want
Import Excel :- It is so boring and time wasting work if we add Emails in database by
typing manually. Instead of that, Just Import your excel sheet which includes all Emails
and just upload it (So simple!). You also don’t need any special type of format for that.
Just put “Email” as title in first row of “Sheet1” and in that column copy your all Emails.
You can keep “Email” column wherever you want (Not necessary to keep it as first
column only means at “A” column only).
View Saved Message :- Do you want to see your saved message to check whether it is
correct and perfect view or not ? Then use View saved message and you can see your
saved message.
- Just select you message name which you defined at Message Setting window and you will able to see your message.
Bulk Email Sender :- So now, we are on main module of this software which will allow
us to send email as per our wish. Yes, I said as per your wish. Want to know how? Then
continue to read more.
- It includes two parts -> Bulk Email and -> Individual Email.
- Bulk Email is default. There, you will see number of Emails stored in database. You will need to enter number of Emails you want to send. And select Message Name. Then click on Send Email and it’s done. You can also view message by selecting Message Name.
- Individual Email You can use this option when we want to send email to someone whose Email id we know means not from the database.
- What if we want to send new writing message which is not related to saved message?
- For this also, I have given facility, Check Write own new message and you will see panel to write Subject and Message.
- And remaining parts you know as per my above explanation.
- If you are using Individual Email or Bulk Email with write own messages then I have given one more facility to attach file.
Requirements :
1) .NET framework 4.0
2) Microsoft office 2007 or later with Access.


Post a Comment